Difference between revisions of "How to Calibrate Camera Optics"
From iPi Docs
m |
(Recording of Calibration Video) |
||
| Line 15: | Line 15: | ||
* Mark camera by some label to distinguish it from others. | * Mark camera by some label to distinguish it from others. | ||
| − | * Set view-angle and resolution you're going to use | + | * Set view-angle and resolution you're going to use during motion capture session(s). |
* {{Tip|720p (1280 x 720) resolution is recommended for full body motion capture needs in most cases (except very large capture area).}} | * {{Tip|720p (1280 x 720) resolution is recommended for full body motion capture needs in most cases (except very large capture area).}} | ||
| − | * {{Important|If you use [https://shop.gopro.com/cameras GoPro] action camera, please don't use [https://gopro.com/help/articles/question_answer/What-is-SuperView | + | * {{Important|If you use [https://shop.gopro.com/cameras GoPro] action camera, please don't use [https://gopro.com/help/articles/question_answer/What-is-SuperView SuperView] mode because in this mode calibration will fail (thanks to special "dynamic stretches" from 4:3 to 16:9 format made by camera software).}} |
* If your camera has zoom and/or auto-focus features then these features must be turned off before calibration because this procedure is valid only for fixed optics. | * If your camera has zoom and/or auto-focus features then these features must be turned off before calibration because this procedure is valid only for fixed optics. | ||
* Run [[iPi Recorder]] and click '''Calibrate Camera Optics''' button in toolbar: | * Run [[iPi Recorder]] and click '''Calibrate Camera Optics''' button in toolbar: | ||
| Line 24: | Line 24: | ||
* Click '''Show Pattern''' button in toolbar of '''PATTERN''' tab of '''Camera Optics Calibration''' tool: | * Click '''Show Pattern''' button in toolbar of '''PATTERN''' tab of '''Camera Optics Calibration''' tool: | ||
<center>[[Image:camera-calibration-show-pattern-button.png|link=]]</center> | <center>[[Image:camera-calibration-show-pattern-button.png|link=]]</center> | ||
| − | * | + | * Start video recording and shoot this pattern from different view angles. For each view: |
| + | ** Ensure the pattern fills most of the frame. It's OK if the whole screen doesn't feet into the frame. | ||
| + | ** Hold the camera still for a second. | ||
| + | * We recommend to use the following five view angles: | ||
| + | |||
| + | <table border=0> | ||
| + | <tr><td>'''View Angle'''</td> | ||
| + | <td><center>'''How it Looks from Side'''</center></td> | ||
| + | <td><center>'''How it Looks from Top'''</center></td> | ||
| + | <td><center>'''How it Looks in Camera'''</center></td> | ||
| + | </tr> | ||
| + | <tr><td colspan=4><hr></td></tr> | ||
| + | <tr><td>1. Front</td> | ||
| + | <td><center>[[Image:camera-calibration-front-view-side.png|x200px|link=]]</center></td> | ||
| + | <td><center>[[Image:camera-calibration-front-view-top.png|x200px|link=]]</center></td> | ||
| + | <td><center>[[Image:camera-calibration-front-view-proj.png|x200px|link=]]</center></td> | ||
| + | </tr> | ||
| + | <tr><td colspan=4><hr></td></tr> | ||
| + | <tr><td>2. From the left</td> | ||
| + | <td><center>[[Image:camera-calibration-left-view-side.png|x200px|link=]]</center></td> | ||
| + | <td><center>[[Image:camera-calibration-left-view-top.png|x200px|link=]]</center></td> | ||
| + | <td><center>[[Image:camera-calibration-left-view-proj.png|x200px|link=]]</center></td> | ||
| + | </tr> | ||
| + | <tr><td colspan=4><hr></td></tr> | ||
| + | <tr><td>3. From the right</td> | ||
| + | <td><center>[[Image:camera-calibration-right-view-side.png|x200px|link=]]</center></td> | ||
| + | <td><center>[[Image:camera-calibration-right-view-top.png|x200px|link=]]</center></td> | ||
| + | <td><center>[[Image:camera-calibration-right-view-proj.png|x200px|link=]]</center></td> | ||
| + | </tr> | ||
| + | <tr><td colspan=4><hr></td></tr> | ||
| + | <tr><td>4. From the top</td> | ||
| + | <td><center>[[Image:camera-calibration-top-view-side.png|x200px|link=]]</center></td> | ||
| + | <td><center>[[Image:camera-calibration-top-view-top.png|x200px|link=]]</center></td> | ||
| + | <td><center>[[Image:camera-calibration-top-view-proj.png|x200px|link=]]</center></td> | ||
| + | </tr> | ||
| + | <tr><td colspan=4><hr></td></tr> | ||
| + | <tr><td>5. From the bottom</td> | ||
| + | <td><center>[[Image:camera-calibration-left-view-side.png|x200px|link=]]</center></td> | ||
| + | <td><center>[[Image:camera-calibration-left-view-top.png|x200px|link=]]</center></td> | ||
| + | <td><center>[[Image:camera-calibration-left-view-proj.png|x200px|link=]]</center></td> | ||
| + | </tr> | ||
| + | </table> | ||
== Processing of Calibration Video == | == Processing of Calibration Video == | ||
Revision as of 10:15, 1 August 2018
Contents
Introduction
Calibration of camera optics is required to find out the values of the following parameters:
- Focal length
- Shift of camera principal point from the center of image
- Radial distortion parameters (2 — 4 coefficients)
- Pixel aspect ratio (optional)
- Pixel shear (optional)
This procedure is strongly mandatory for modern wide-angle cameras including action cameras. The thing is that these cameras has significant distortion.
Recording of Calibration Video
- Mark camera by some label to distinguish it from others.
- Set view-angle and resolution you're going to use during motion capture session(s).
- Tip: 720p (1280 x 720) resolution is recommended for full body motion capture needs in most cases (except very large capture area).

- If your camera has zoom and/or auto-focus features then these features must be turned off before calibration because this procedure is valid only for fixed optics.
- Run iPi Recorder and click Calibrate Camera Optics button in toolbar:

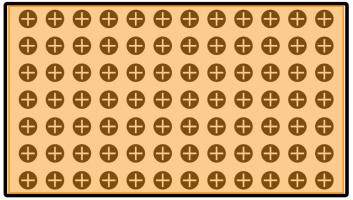
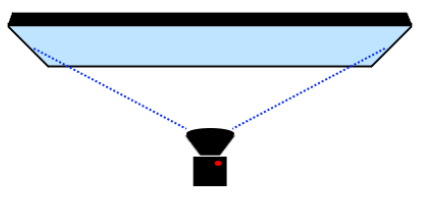
- To calibrate camera optics special calibration pattern is used. You have to record this pattern shown on computer screen from different view points.
- Click Show Pattern button in toolbar of PATTERN tab of Camera Optics Calibration tool:

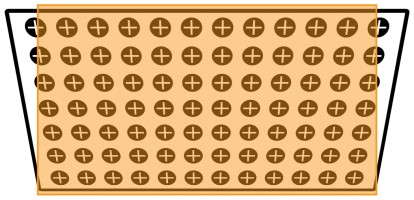
- Start video recording and shoot this pattern from different view angles. For each view:
- Ensure the pattern fills most of the frame. It's OK if the whole screen doesn't feet into the frame.
- Hold the camera still for a second.
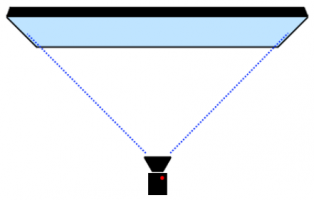
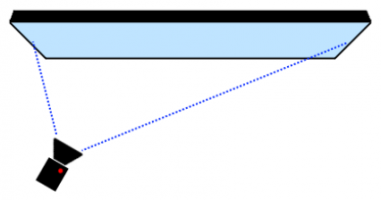
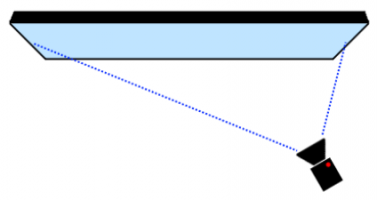
- We recommend to use the following five view angles:
| View Angle | |||
| 1. Front |  |
 |
 |
| 2. From the left |  |
 |
 |
| 3. From the right |  |
 |
 |
| 4. From the top |  |
 |
 |
| 5. From the bottom | |
|
|